Hopia Recipe: 7 Easy Secrets for Perfect Flaky Pastry
I used to buy hopia from a bakery every time I craved something sweet and flaky. It always felt like something too hard to make at home. The layers looked perfect, and I assumed only bakeries could get it right.
Then I tried making it once. I messed up the dough, overfilled it, and still ended up eating every piece. That’s when I realized hopia is not difficult. It just needs patience and a simple method.
This Hopia Recipe breaks everything down in a clear way. You’ll learn how to make flaky pastry, rich ube or monggo filling, and cook it either in a pan or oven. No fancy tools needed. Just simple steps and a little time.
What Is Hopia Recipe and Why This Filipino Pastry Snack Is So Popular?
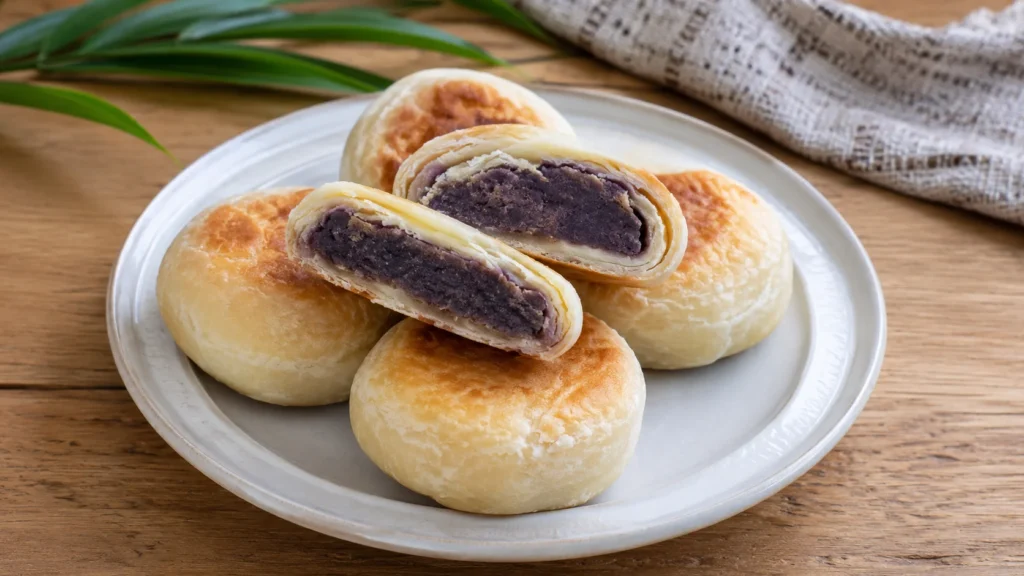
Hopia is a Filipino pastry snack made with flaky dough and sweet filling like mung bean (monggo) or ube halaya. It is soft inside, slightly crisp outside, and usually enjoyed as a merienda or snack. It takes about 1–2 hours to make and is popular because of its rich filling and layered texture.
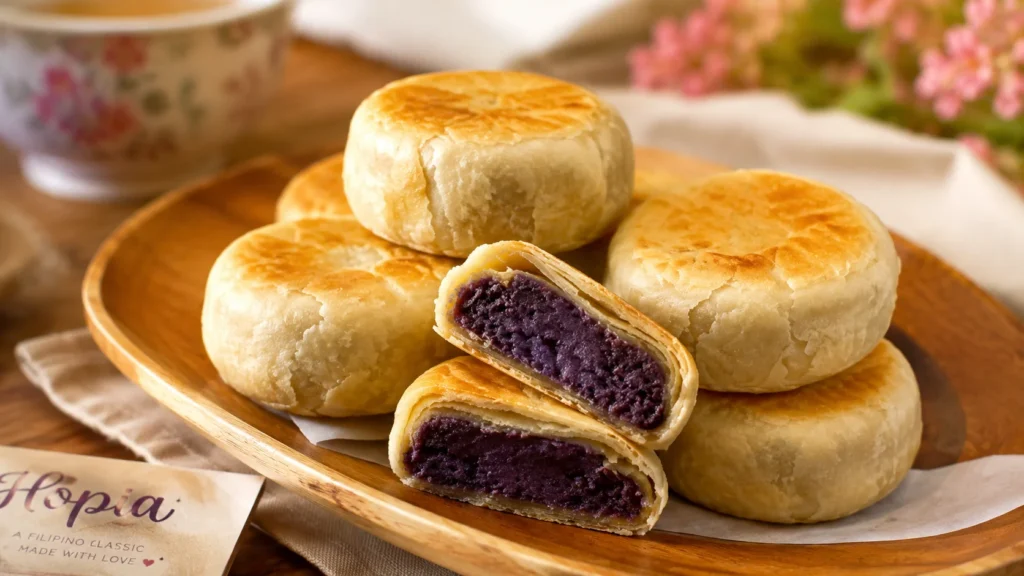
Hopia is a well-loved Filipino bakery treat. You’ll often see it in boxes at local bakeries like Eng Bee Tin or small neighborhood shops. It has a thin crust and a soft, sweet center.
The most common fillings are monggo (mung bean) and ube (purple yam). Some modern versions also use custard, chocolate, or even pork-based fillings like hopia baboy.
The texture is what makes it special. When done right, the crust flakes apart gently while the filling stays smooth and rich.
Hopia Recipe Overview and What Makes It Worth Making at Home?
Homemade hopia tastes fresher and less sweet than store-bought versions. You also control the filling and fat, which changes the flavor a lot.
Here’s a quick overview before you start.
| Detail | Info |
|---|---|
| Prep Time | 45 minutes |
| Cook Time | 30–40 minutes |
| Total Time | 1 hour 15 minutes |
| Servings | 12–14 pieces |
| Difficulty | Medium |
| Cuisine | Filipino |
| Calories | ~180–250 per piece |
| Cost | ~$3–$5 per batch (homemade) |
A homemade batch is usually much cheaper than bakery hopia. Store-bought can cost per piece what a full homemade batch costs.
Ingredients and What Each One Does in Hopia Recipe Dough and Filling
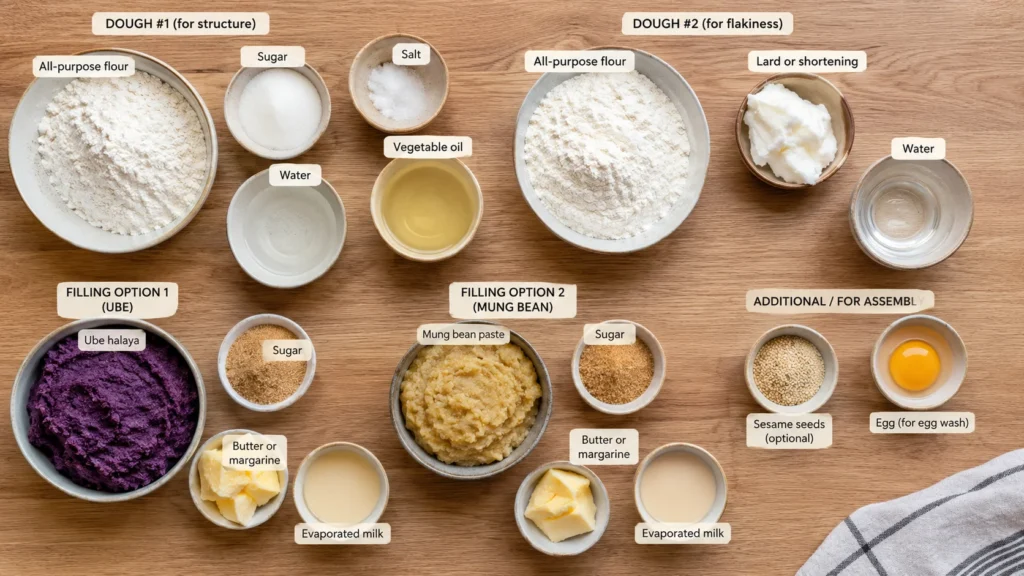
Hopia uses two doughs. One gives structure. One gives flakiness. The filling gives flavor and sweetness.
You’ll also need ube halaya or mung beans depending on your version.
Key ingredients explained
Flour builds structure in the dough. Too much and it gets tough. Too little and it falls apart.
Fat (butter, shortening, or oil) creates layers. It separates the dough so it becomes flaky when cooked.
Ube or monggo filling gives the main flavor. Ube is creamy and sweet. Monggo is earthy and smooth.
Easy substitutions
- Butter → vegetable shortening for a more traditional flaky texture
- Ube halaya → store-bought jam if needed (just reduce sugar elsewhere)
- Monggo beans → yellow mung beans or red beans
How to Make Hopia Recipe Step by Step Without Breaking the Dough
The process is simple: make dough, layer it, fill it, then cook. The key is not rushing the folding.
You’ll build layers through folding, similar to puff pastry.
Step 1: Make the base dough

Mix flour, water, oil, and salt until a rough dough forms. It should look shaggy, not smooth.
This texture helps build structure later.
Step 2: Make the fat dough
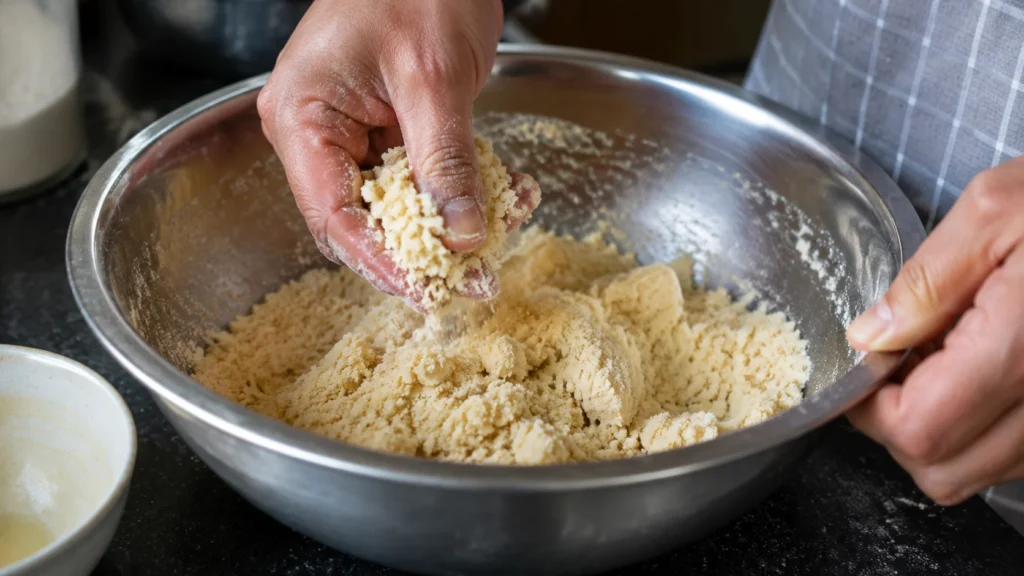
Mix flour, sugar, and butter until crumbly. It should hold when pressed but not be smooth.
This is what creates flaky layers.
Step 3: Combine and layer

Roll the base dough flat. Spread the fat dough on top.
Roll gently until combined. You should see streaks of fat.
Step 4: Fold the dough
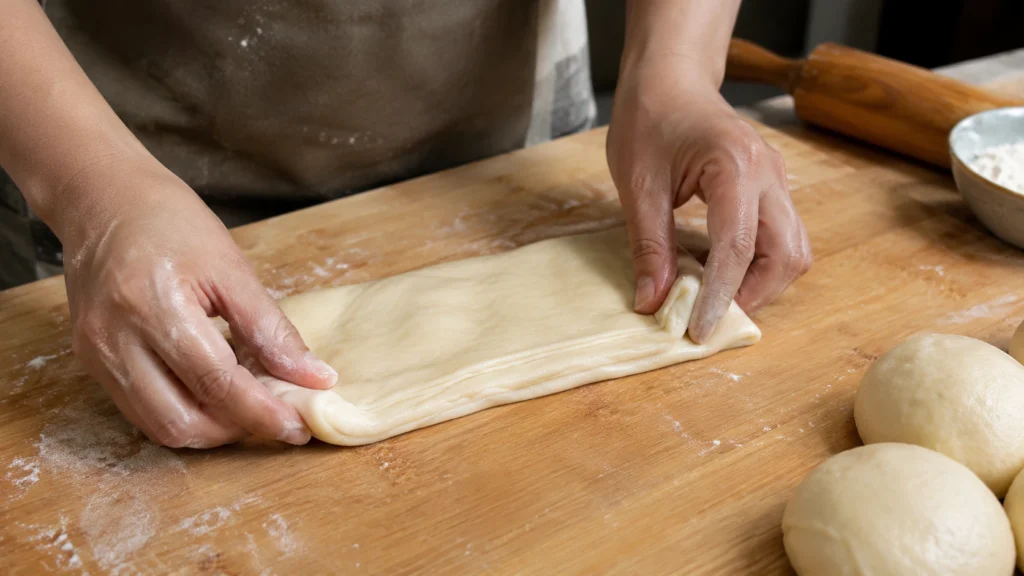
Fold like a letter. Then flatten again. Repeat 2–3 times.
This builds layers. You’ll see thin stripes in the dough.
Step 5: Cut and fill

Slice dough into small pieces. Flatten each one. Add 1 tablespoon filling.
Do not overfill or it may burst while cooking.
Step 6: Shape and cook

Seal the edges tightly. Cook on medium heat or bake at 350°F (180°C).
Cook until golden and slightly crisp on both sides.
The One Mistake That Ruins Hopia Recipe Texture Every Time
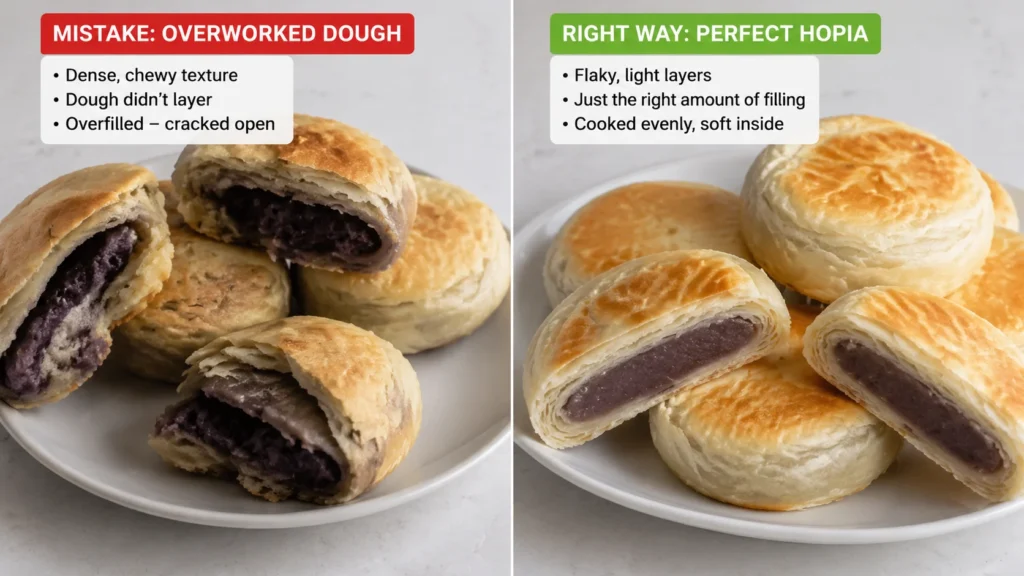
Most people fail hopia for one reason: overworking the dough.
When you mix or knead too much, the gluten becomes strong. That makes the pastry chewy instead of flaky.
Another mistake is overfilling. The dough stretches too far and breaks open while cooking.
Heat is also important. Too high, and the outside burns before the inside cooks.
Quick tips to avoid failure
- Stop mixing when dough just comes together
- Use only 1 tablespoon filling per piece
- Cook on medium heat, not high
- Chill dough if it becomes soft or sticky
Pro Tip That Makes Hopia Recipe Extra Flaky and Light
The biggest upgrade is resting the dough between folds.
This matters because gluten relaxes during rest. When gluten is relaxed, the dough rolls thinner without snapping back.
It also helps butter stay cold. Cold fat creates steam pockets when heated, which turns into flaky layers.
If your kitchen is warm, chill the dough for 10–15 minutes between folds. This one step can completely change the texture.
Easy Hopia Recipe Variations You Can Try at Home
Hopia is flexible. Once you learn the base dough, you can change the filling easily.
- Ube hopia — sweet and creamy purple yam filling
- Monggo hopia — classic mung bean version with earthy taste
- Hopia baboy — savory-sweet pork filling with kundol
- Chocolate hopia — modern version with cocoa filling
- Cheese hopia — salty-sweet twist popular with kids
- Vegan hopia — use oil instead of butter and dairy-free filling
What to Serve With Hopia Recipe for a Complete Snack Experience
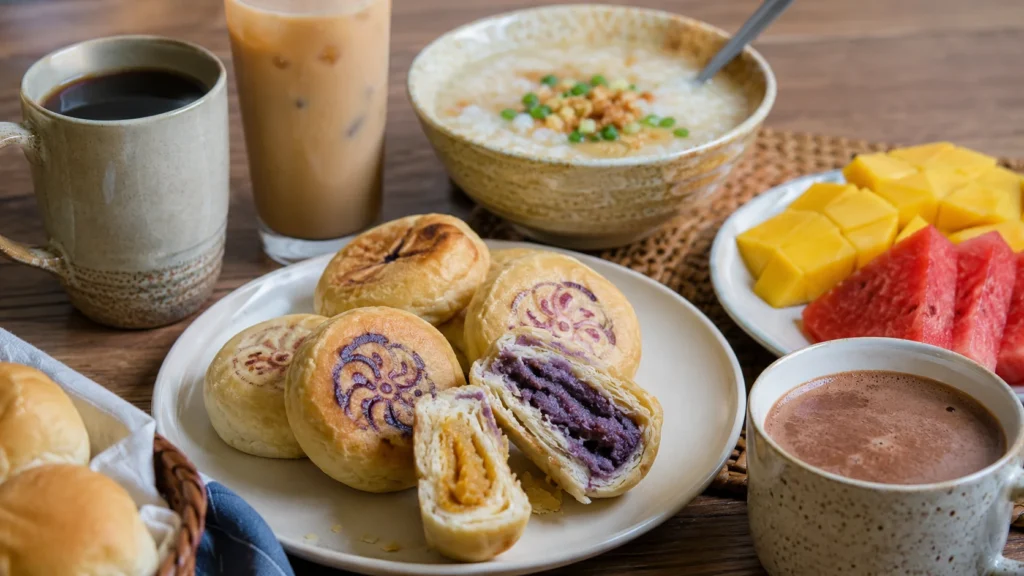
Hopia is usually eaten as a snack, but pairing it makes it even better.
- Hot coffee — balances sweetness and richness
- Milk tea — popular modern pairing for merienda
- Hot chocolate — makes it feel extra comforting
- Fresh fruit — helps cut through the sweetness
- Rice porridge (lugaw) — traditional Filipino combo
If you enjoy Filipino baking, try pairing this with our homemade pandesal recipe or ube halaya guide for a full merienda spread.
My Honest Experience Making This Hopia Recipe at Home
The first time I made hopia, I rolled the dough too thin and the filling leaked out. It was messy but still tasty.
What fixed it was chilling the dough and using less filling. I also stopped rushing the folding process.
What surprised me most was how close it tasted to bakery hopia. The homemade version even felt less greasy and more balanced.
How to Store, Freeze, and Reheat Hopia Recipe Properly
Hopia stays fresh for a few days if stored correctly. Texture changes slightly over time but it still tastes great.
- Room temp: 1–2 days in airtight container
- Fridge: up to 5 days
- Freezer: up to 2 months
To reheat, warm in a pan for 2–3 minutes or bake at low heat. This brings back some crispness.
You can also freeze unbaked hopia and cook them straight from frozen. Just add a few extra minutes.
Frequently Asked Questions About Hopia Recipe

Hopia Recipe (Flaky Filipino Pastry with Ube or Monggo Filling)
Ingredients
Equipment
Method
- Mix flour, water, oil, and salt in a bowl until a shaggy dough forms. It should look rough but hold together when pressed.
- In another bowl, mix flour, sugar, and butter until crumbly. The mixture should hold when squeezed but not be smooth.
- Roll out the base dough and place the fat dough on top. Gently press together until streaks of butter appear.
- Fold the dough like a letter, then roll it out again. Repeat 2–3 times until light layers start forming.
- Cut dough into equal pieces and flatten each one into a small circle. Add about 1 tablespoon of filling in the center.
- Seal the edges tightly and shape into a ball or disc. Make sure no filling is exposed to avoid leaks.
- Cook on medium heat in a pan or bake at 350°F (180°C). Turn until both sides are golden and slightly crisp.
- Let cool for 10–15 minutes so the filling sets and the layers become firmer.
Notes
Final Thoughts on Hopia Recipe and Why It Works Every Time
This Hopia Recipe works because it keeps things simple. Two doughs, one filling, and careful folding. That’s it.
Once you understand how the layers form, it becomes easy to repeat. You can switch fillings, adjust sweetness, and even scale it for parties or small business use.
If you try this at home, don’t worry about perfect shapes on your first batch. Focus on texture and taste first.
If you make this, I would love to know how it turned out. Drop a comment below and share your experience.