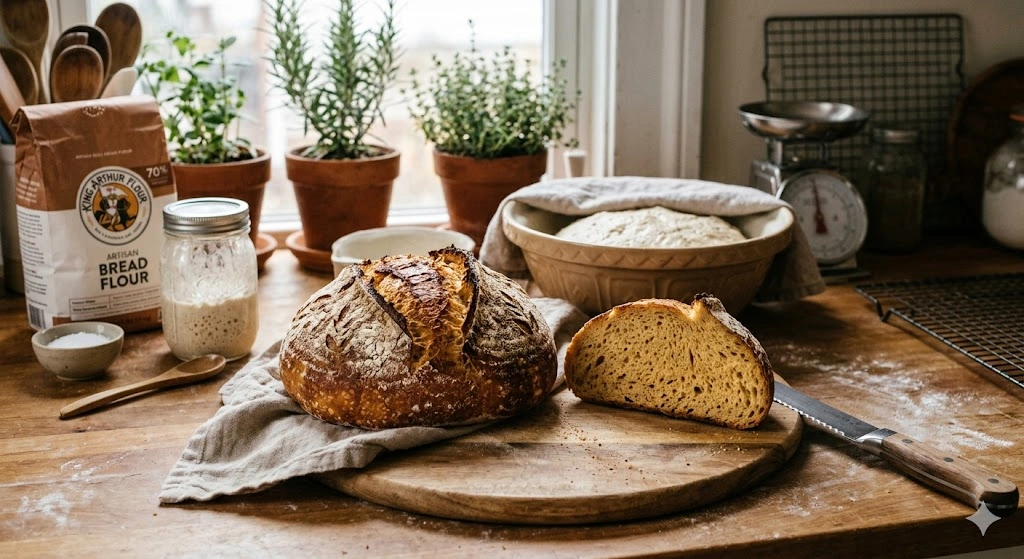
Low hydration sourdough recipe bread is one of those recipes that feels instantly more manageable the first time you handle it. The dough is firmer, less sticky, and easier to shape compared to wetter artisan loaves. For many home bakers, especially beginners, this style is the first time sourdough actually feels “controllable” instead of messy and unpredictable.
What makes it so popular is its reliability. Instead of chasing an open, hole filled crumb, you get a structured loaf that slices beautifully for sandwiches, toast, and everyday meals. It still has that signature sourdough flavor slightly tangy, deeply wheaty, and complex but without the stress of high hydration dough sticking to everything. This is the kind of bread people bake when they want sourdough in their weekly routine, not just a weekend experiment.
Understanding Sourdough Hydration Without the Confusion
Hydration simply means how much water is in your dough compared to flour. It’s written as a percentage, and it changes everything about how your bread behaves.
Hydration=waterflour×100\text{Hydration} = \frac{\text{water}}{\text{flour}} \times 100Hydration=flourwater×100
A 60% hydration dough is stiff and structured, while 80% is loose, sticky, and more challenging to handle. But what most recipes don’t show is how dramatically these numbers affect real baking results.
A single serving pancake recipe is perfect when you want a quick, fluffy breakfast without leftovers or extra cleanup.
Real Hydration Comparison (What It Actually Feels Like)
| Hydration | Dough Feel | Crumb | Difficulty | Best For |
| 60% | stiff, easy to shape | tight, even crumb | beginner | sandwich bread, toast |
| 70% | soft but controlled | semi open crumb | medium | everyday artisan loaf |
| 80% | sticky, loose | open, airy crumb | advanced | rustic bakery style bread |
This is where most bakers finally “get it” hydration isn’t just math, it’s behavior in your hands.
low hydration sourdough recipe vs High Hydration Dough (Real Baking Differences)
Low hydration dough (around 60–65%) is firm enough to hold its shape without collapsing. That means shaping is easier, scoring is cleaner, and baking is more forgiving.
High hydration dough, on the other hand, creates those dramatic airy holes you see in bakery loaves but it requires confidence, fast handling, and strong gluten development.
If you’re deciding between the two, think of it this way:
Low hydration = structure, control, reliability
High hydration = openness, complexity, skill
Neither is better; they just serve different bread goals.
Recipe Overview: Taste, Texture, and When to Bake It
This low hydration sourdough bread is mildly tangy with a chewy but soft interior. The crust bakes up golden and crisp but not overly hard, making it ideal for sandwiches and everyday eating.
It’s the kind of loaf you bake when you want something dependable, no guessing if it will spread too much or collapse in the oven.
Quick Recipe Snapshot
| Detail | Info |
| Prep Time | 30 minutes |
| Cook Time | 45 minutes |
| Total Time | ~12–18 hours (including fermentation) |
| Servings | 1 loaf (16 slices) |
| Difficulty | Easy |
| Calories | ~119 kcal per slice |
Why You’ll Love This Low Hydration Sourdough Recipe
There’s a reason so many bakers keep returning to low hydration dough.It’s forgiving. It’s predictable. And it teaches you the fundamentals of sourdough without overwhelming you with sticky dough disasters.
You’ll especially love this recipe if you want a loaf that slices cleanly for sandwiches, holds butter without falling apart, and fits easily into a weekly baking rhythm.
Ingredients and Why Each One Matters
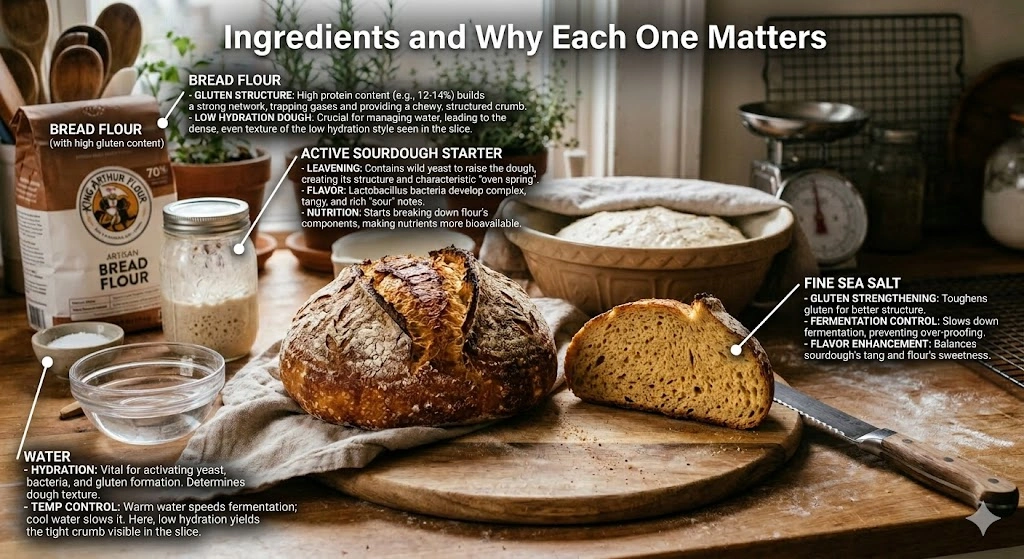
Low hydration sourdough is built on simple pantry staples, but each ingredient plays an important role in structure and fermentation.
- Bread flour (500g): Gives strength and structure due to higher protein content
- Water (300–325g): Controls hydration and dough firmness
- Active sourdough starter (100–150g): Provides natural yeast and fermentation power
- Salt (10g): Strengthens gluten and enhances flavor
- Optional avocado oil (25g): Softens crumb slightly and improves shelf life
Flour Protein Matters More Than You Think
| Flour Type | Protein % | Effect on Dough |
| All purpose | 10–11% | softer, weaker structure |
| Bread flour | 12–14% | ideal for sourdough strength |
| High gluten | 14–15% | very strong, chewy texture |
Higher protein flour absorbs more water, which directly affects how “low hydration” your dough actually feels.
Cost Per Loaf Breakdown (Real Home Baking Costs)
Most recipes skip this, but it matters especially if you bake often.
| Ingredient | Estimated Cost |
| Flour | $0.80 |
| Salt | $0.05 |
| Starter maintenance | $0.00–$0.10 |
| Electricity (baking) | $0.15–$0.25 |
| Total | ~$1.05 per loaf |
Compared to store bought artisan bread, this is significantly more budget friendly.
Tools That Make low hydration sourdough recipe Easier to Handle
You don’t need fancy equipment, but a few tools make a big difference:
- Kitchen scale (for accuracy in baker’s math)
- Mixing bowl or dough tub
- Bench scraper for shaping
- Banneton basket for structure
- Dutch oven for oven spring and crust development
- Razor blade or lame for scoring
A heavy pot traps steam naturally, helping the loaf expand properly in the oven.
How to Make low hydration sourdough recipe Step by Step
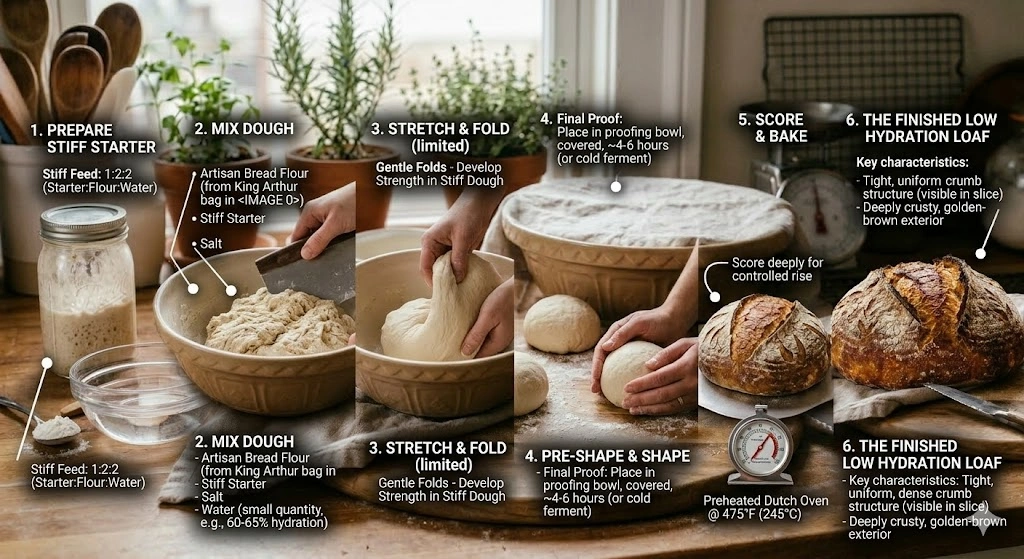
Start by mixing your active, bubbly sourdough starter with water until it dissolves. Add flour and salt, then mix until a shaggy dough forms. At this stage, the dough will feel stiff and slightly rough not smooth yet. That’s normal.
1. Rest and First Mix
Let the dough rest for about 15–30 minutes. It will start absorbing water and become easier to handle.
2. Stretch and Fold Development
Over the next 2 hours, perform 3–4 sets of stretch and fold every 30 minutes. You’ll notice the dough gradually shifting from shaggy to elastic.
- Early stage: stiff, slightly dry feel
- Mid stage: smoother, more cohesive
- Final stage: holds shape, slightly springy
3. Bulk Fermentation
Let the dough rise for 4–12 hours depending on room temperature. In warmer kitchens, fermentation happens faster; in cooler spaces, it slows down.
Look for:
- Slight doming
- Air bubbles along the edges
- Increased volume (not necessarily doubled)
Pro Tip for Better Low Hydration Sourdough recipe
One of the most overlooked techniques is adjusting water based on your environment. Humidity changes everything. In humid climates, reduce water by 10–15g. In dry climates, add 10–20g more water.This small adjustment can completely change how your dough handles and prevents unnecessary stickiness.
A muscadine jelly recipe is a sweet, tangy way to preserve fresh grapes and elevate your breakfast spreads with homemade flavor.
Common Mistakes and Why They Ruin the low hydration sourdough recipe
Low hydration dough is forgiving, but not immune to errors.
- Weak starter leads to dense bread because fermentation never fully develops
- Under kneading causes tearing and poor structure
- Over fermentation results in flat, over proofed loaves
- Wrong flour protein changes hydration behavior unexpectedly
Variations, Substitutions, and When to Use Them for Different Baking Goals
One of the reasons I love this low hydration sourdough recipe is how easily you can adjust it based on what you want from your loaf. It’s a very flexible dough once you understand how hydration and flour interact.
If you want a slightly softer crumb, you can replace a small portion of bread flour with all purpose flour. This lowers the overall protein strength and makes the loaf a bit more tender, though you may lose a little structure.
For a more rustic, hearty flavor, swapping in 10–20% whole wheat flour works beautifully. The dough will feel a bit tighter, and fermentation may speed up slightly because whole wheat tends to ferment more actively.
If you prefer a richer loaf, adding a small amount of avocado oil or olive oil can soften the crumb and extend freshness. It’s especially helpful if you’re planning to use the bread for sandwiches throughout the week.
You can also adjust hydration slightly depending on your goal: keep it lower (around 60%) for tight sandwich loaves, or push closer to 65–68% if you want a slightly more open crumb while still keeping structure.
My Personal Experience Making This Low Hydration Sourdough recipe at Home
The first time I made a low hydration sourdough recipe loaf, I honestly didn’t expect to enjoy it as much as I did. I was used to chasing open crumb, high hydration doughs that looked beautiful on Instagram but were honestly stressful in a home kitchen.
What surprised me most was how calm this dough felt to work with. I remember thinking during the first mix, “this actually feels like bread dough should feel” firm, structured, and predictable.
One mistake I made early on was underestimating fermentation just because the dough wasn’t wet or bubbly looking. I pulled it too early, and the loaf came out dense. After that, I learned to trust the signs’ air pockets on the sides, a gentle rise, and a soft jiggle instead of volume alone.
The biggest improvement came when I stopped rushing the stretch and folds. Once I gave the dough time to fully relax between folds, the final loaf had a much better rise and a smoother crumb.
Now, this is the loaf I make when I don’t want to think too hard but still want something reliable on the counter.
Benefits of low hydration sourdough recipe (Why Bakers Keep Coming Back to It)
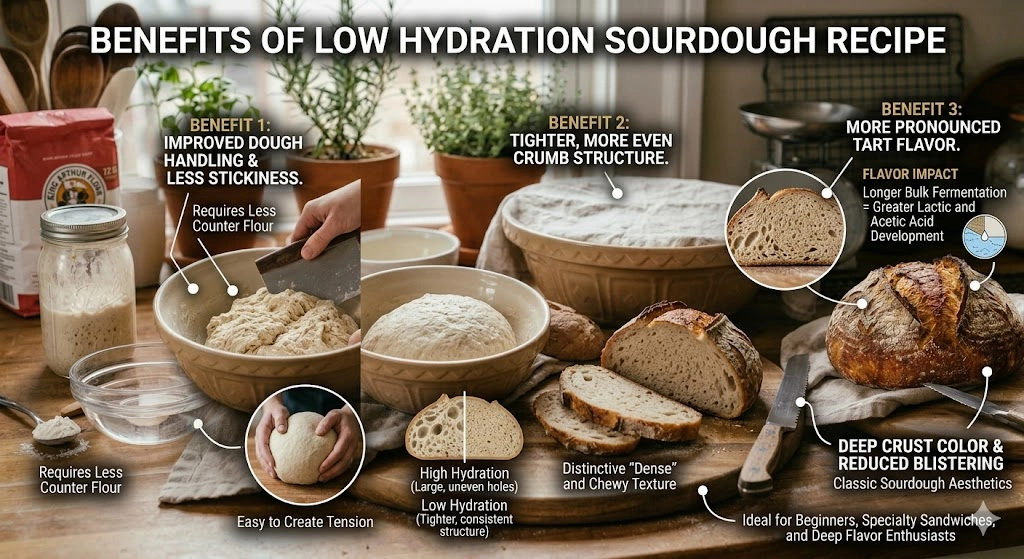
Low hydration sourdough recipe isn’t just easier, it actually fits better into everyday life for most home bakers.
For starters, it’s much more forgiving during shaping and fermentation. You don’t need perfect technique or lightning fast hands to get a good result, which makes it ideal for beginners or busy bakers.
It also produces a loaf that holds up well in daily use. Whether you’re making sandwiches for kids, toast for breakfast, or serving soup at dinner, the structure stays intact without falling apart or feeling too airy.
Another benefit is consistency. Because the dough is less sensitive to small hydration or temperature changes, your results tend to be more predictable from bake to bake.
In a simple sense, this bread is commonly enjoyed because it balances flavor, texture, and practicality without requiring advanced baking skills.
Key Benefits at a Glance
- Easier shaping and handling compared to high hydration dough
- More consistent results for home bakers
- Ideal structure for sandwiches and toast
- Less sensitivity to beginner mistakes
- Works well in most home kitchen environments
Supporting Information: What Actually Makes This low hydration sourdough recipe Work
Low hydration sourdough behaves differently because of how gluten and fermentation interact in a stiffer environment.
When hydration is lower, gluten strands form more tightly, which gives the dough its strength and structure. This is why the loaf holds its shape so well during baking.
At the same time, fermentation still depends heavily on wild yeast activity in your sourdough starter. A strong, active starter is essential here, especially one that has been recently fed and is at peak activity (doubled in size and bubbly).
Temperature also plays a major role. In warmer kitchens, fermentation speeds up significantly, while cooler environments slow everything down and may require longer bulk fermentation times.
This is also where baker’s math becomes useful. Even a small change in hydration just 5–10% can noticeably affect dough behavior, especially when combined with flour type and starter hydration.
Understanding these small interactions is what turns this from just a recipe into a repeatable baking system.
Key takeaways:
- Always use an active, bubbly starter
- Watch dough texture, not just the clock
- Don’t rush bulk fermentation
A maple syrup recipe lets you create rich, naturally sweet syrup at home, perfect for drizzling over pancakes and breakfast favorites.
Problems & Fixes (Why Your Dough Still Feels Sticky)
Even low hydration dough can feel sticky and that surprises many bakers.
Here’s why it happens:
- Gluten not fully developed yet
- Dough is over fermented and breaking down
- High ambient humidity
- Flour protein too low
Failure Case Guide
- Flat loaf → underproofed or weak starter
- Dense brick → under fermented or weak gluten
- Tearing dough → not enough folding
- Sticky mess → fermentation too far or weak flour
Knowing these signs helps you fix problems before baking instead of guessing afterward.
Storage, Freezing, and How Texture Changes Over Time
Low hydration bread changes noticeably over a few days.
| Day | Texture |
| Day 1 | crisp crust, soft interior |
| Day 2 | slightly firmer crumb |
| Day 3 | best for toasting |
Storage tips:
- Room temperature: 2–3 days in paper bag or bread box
- Freezer: up to 3 months wrapped tightly
- Reheat: 350°F for 10–15 minutes
Unlike high hydration bread, this style actually improves for toast as it ages.
FAQ: Real Questions People Ask
Why is my low hydration sourdough still sticky?
This usually happens when gluten hasn’t fully developed or fermentation went too far. Even low hydration dough needs proper folding and timing.
Can I use all purpose flour instead of bread flour?
Yes, but expect a softer structure and slightly stickier dough because of lower protein content.
How do I know when bulk fermentation is done?
Look for a slightly puffed dough with bubbles and a gentle jiggle rather than strict doubling.
Why did my bread come out dense?
Most often, it’s a weak starter or under fermented dough.
Can I refrigerate the dough overnight?
Yes, cold fermentation can improve flavor and make scoring easier.
Is low hydration better for beginners?
Absolutely. It’s more forgiving and easier to shape.
Baker’s Timeline for a One Day Bake
- Morning: mix dough and rest
- Midday: stretch and folds
- Afternoon: bulk fermentation
- Evening: shape and proof
- Night: bake and cool
Total hands on time is surprisingly low, even though fermentation takes hours.
low hydration sourdough recipe
Ingredients
Equipment
Method
- In a large bowl, mix sourdough starter and water until fully dissolved and milky-looking. The mixture should feel smooth before adding flour.
- Add bread flour and salt, then mix until a shaggy, stiff dough forms. It will look dry and rough at first, which is normal for low hydration dough.
- Cover and let the dough rest for 20–30 minutes so the flour fully absorbs the water and becomes easier to handle.
- Perform 3–4 sets of stretch and folds every 30 minutes. The dough will gradually become smoother, stronger, and slightly elastic.
- Allow bulk fermentation for 4–12 hours depending on room temperature. The dough should look slightly puffed with small air pockets forming.
- Shape the dough into a tight round or batard, making sure the surface feels firm and holds tension without sticking excessively.
- Place in a floured banneton and proof until slightly risen and jiggly, usually 1–2 hours or overnight in the fridge.
- Preheat oven to 450°F (230°C) with Dutch oven inside for at least 30 minutes before baking.
- Score the dough with a sharp blade, then bake covered for 30 minutes and uncovered for 10–15 minutes until deep golden brown.
- Cool on a wire rack for at least 1 hour before slicing to allow crumb structure to set properly.
Video
Notes
Conclusion
Low hydration sourdough recipe is the kind of recipe that builds confidence in home baking. It’s structured, reliable, and deeply satisfying without requiring advanced techniques.
Once you understand how hydration, flour strength, and fermentation interact, this loaf becomes one of the easiest and most rewarding breads you can bake at home.
If you try it once, chances are it will become part of your weekly routine especially for sandwiches, toast, and simple comfort meals.
Sentence: Discover more sweet and cozy breakfast recipes to pair perfectly with this homemade maple syrup.